If yo accidentally got locked out of your WordPress powered website, you’re not alone… however there are different ways you can get back in, I’ll discuss 3 ways here.
First Step: Database Email Update
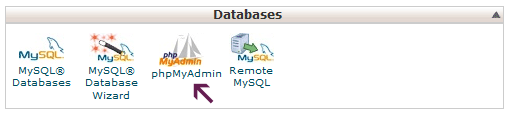
First, you need to login to phpMyAdmin and locate your WordPress database. (Below is a screenshot of a HostGator cPanel)
The click on your database and click on the row containing “wp-users” as shown in the image below…

You may not have a list of emails in your database as shown here, but as long as you have at least one, you’re good to go.
- Click on “edit” on the row and change the email to your current email address, save and exit.
- The go to your WordPress login page and click on “reset password”.
- Input your current email address as in the database and click “reset”.
- Allow about 2 minutes and go to your email inbox and click on the email sent to you from your website containing steps to reset your password… mostly to click on a button which will take you back to the website to input a new password.
- Lastly, login with your current email and new password.
(in case you logged in and found out you have a limited access to the dashboard, i.e. email is a subscriber account, go on to the next steps).
Second Step: Database Insert
Once you are in, we will be making changes to the wp_users and wp_usermeta tables. Lets go ahead and click on wp_users table.
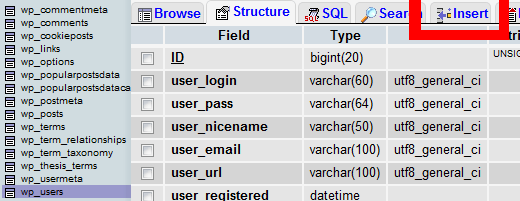
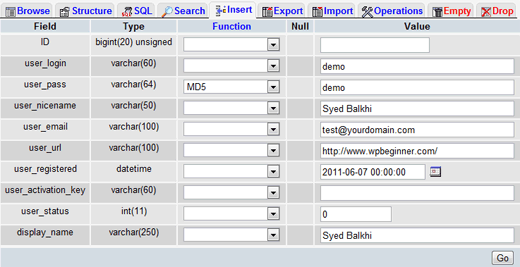
We need to insert our new admin user’s information, so click on the Insert tab like it shows in the image above. In the insert form, add the following:
- ID – pick a number (in our example, we will use the number 4).
- user_login – insert the username you want to use to access the WordPress Dashboard.
- user_pass – add a password for this username. Make sure to select MD5 in the functions menu (Refer to the screenshot below).
- user_nicename – put a nickname or something else that you would like to refer yourself as.
- user_email – add the email you want to associate with this account.
- user_url – this would be the url to your website.
- user_registered – select the date/time for when this user is registered.
- user_status – set this to 0.
- display_name – put the name you like to display for this user on the site (it can be your user_nicename value as well).
- Click on the Go Button
Next we are going to have to add the values to wp_usermeta table. Click on the wp_usermeta table and then click on the Insert tab just like the previous step. Then add the following information to the insert form:
- unmeta_id – leave this blank (it will be auto-generated)
- user_id – this will be the id of the user you created in the previous step. Remember we picked 4.
- meta_key – this should be wp_capabilities
- meta_value – insert this:
a:1:{s:13:"administrator";s:1:"1";}
Insert another row with the following information:
- unmeta_id – leave this blank (it will be auto-generated)
- user_id – this will be the id of the user you created in the previous step. Remember we picked 4.
- meta_key – this should be wp_user_level
- meta_value – 10
Then click on the Go button, and you have created yourself a new username. Now you should be able to login to your wp-admin with the username and password you specified for this user. Once logged in, click on Users and edit the username you just created. Go down and click on the Save button (you don’t have to change anything). This will allow WordPress to go through and add some more information and clean-up the user we just added.
Third Step: SQL query
For developers who want to speed this process up, you can simply drop this SQL query in your database.
INSERT INTO `databasename`.`wp_users` (`ID`, `user_login`, `user_pass`, `user_nicename`, `user_email`, `user_url`, `user_registered`, `user_activation_key`, `user_status`, `display_name`) VALUES ('4', 'demo', MD5('demo'), 'Your Name', 'test@yourdomain.com', 'http://www.test.com/', '2011-06-07 00:00:00', '', '0', 'Your Name'); INSERT INTO `databasename`.`wp_usermeta` (`umeta_id`, `user_id`, `meta_key`, `meta_value`) VALUES (NULL, '4', 'wp_capabilities', 'a:1:{s:13:"administrator";s:1:"1";}'); INSERT INTO `databasename`.`wp_usermeta` (`umeta_id`, `user_id`, `meta_key`, `meta_value`) VALUES (NULL, '4', 'wp_user_level', '10'); |
Remember to change the databasename to the database you are working with. Also don’t forget to change the appropriate values.
If you found this article helpful, give us a like or comment. And if you have more ways to update, please include it in the comment section below.